When a PC begins to show signs of fatigue, it is almost always the same thing. If your computer has problems with slowness, it is probably because you have many programs installed because the hard disk is fragmented. Apart from possible infections or malware, there is also the possibility that the components like the RAM have become outdated to run the new programs that are going to market.
One of the main performance problems is usually caused by excessive consumption of RAM. You can check your RAM speed to confirm. If the applications have “cannibalized” the RAM on your computer, it is necessary to put a brake on it by carrying out some maintenance tasks.
1. Identify the programs that consume the most RAM
Some applications are true RAM eaters. The first step in solving excessive RAM consumption is to identify the problematic applications.
- Start the PC and work normally until you detect a performance drop.
- Now open the Windows Task Manager (right-click on the desktop taskbar -> Task Manager).
- Click on the “Memory” column to sort the processes according to their RAM consumption.
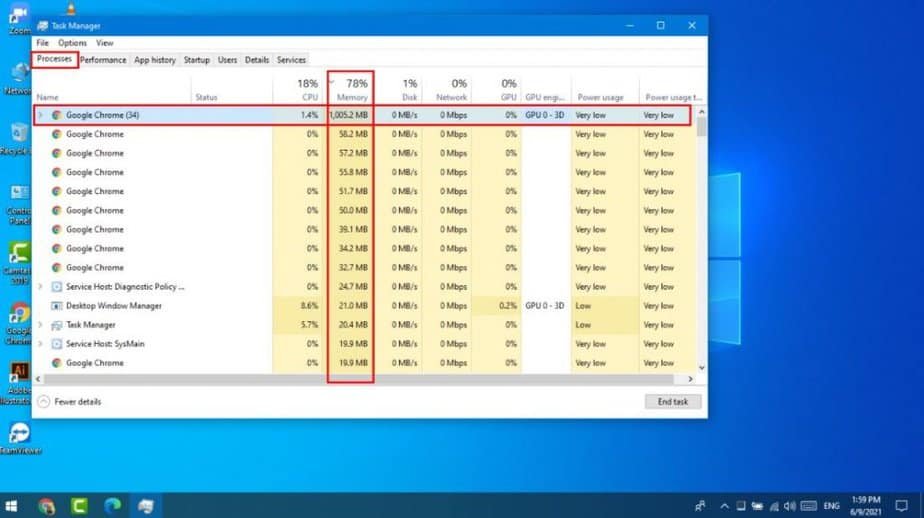
This will help you to see first-hand which applications are using the most RAM. If you detect an application with abnormal consumption, the best thing you can do is uninstall that application. Open the Windows configuration panel and go to “Add or remove programs.”
Some programs like web browsers tend to consume a lot of resources, especially RAM. To avoid this, try not to have too many tabs open at the same time.
2. Remove programs from Windows startup
Another factor that makes your RAM sigh for a bit of peace is the programs that run automatically when we start Windows. If you have a lot of programs configured to start when the system starts, this will result in greater consumption of RAM and resources.
- Open the Windows task manager again.
- Go to the “Home” tab.
- Look only at programs with “Status: Enabled.” These are the applications that start automatically whenever you start your PC.
From here, it simply identifies those programs that are not necessary for the normal startup of the computer. For example, do you really need Spotify to start automatically when you turn on the PC?
Click on the program you want to remove from startup and click on the “Disable” button that you will see at the bottom of the window. Repeat this process with all the programs that you do not consider essential to start the PC.
Don’t worry, if at any time you want to use that program, you just have to open it when you need it. You are not uninstalling or removing it from your system.
Once this is done, restart the PC, and you will see how the system loads faster and consumes fewer resources at startup.
3. Free pending tasks
If you carry out long work sessions with the PC, you are likely to open and close applications many times. This causes some programs to not properly free their allocated memory.
To solve this and close all those system processes that may have been pending in the background and consuming resources, you can create a shortcut on the desktop that releases all those processes.
- Right-click on the Windows desktop and select “New -> Shortcut.”
- In the field, “Write the location of the element,” paste the following command: % windir% \ system32 \ rundll32.exe advapi32.dll, ProcessIdleTasks
- Click on “Next.”
- Enter a name to identify this shortcut, such as “Release To Do’s.”
- Click on the “Finish” button.
So, when you notice that the PC begins to slow down, run this shortcut. The performance improvement process is not immediate, but you will see how the system goes a little more fluid after a while.
4. Empty the paging file when turning off the computer
The Windows paging file is a file used by the system as extra RAM memory when the physical RAM of the computer is already full. When you restart the PC, the RAM memory empties, but the same does not happen with the paging file.
To solve this, you can configure Windows to empty the paging file when turning off the PC.
Warning: This is a delicate process that could break your PC. If you are not sure what you are doing, it is best not to go ahead.
- Press the key combination “Win + R” and type the command “regedit” to open the Windows registry editor.
- In the side menu, navigate to the path HKEY_LOCAL_MACHINE \ SYSTEM \ CurrentControlSet \ Control \ Session Manager \ Memory Management.
- In the right panel, double click on “ ClearPageFileAtShutdown ”.
- Set the value to “1” and click on “OK.”
In this way, you will have a clean paging file every time we start Windows.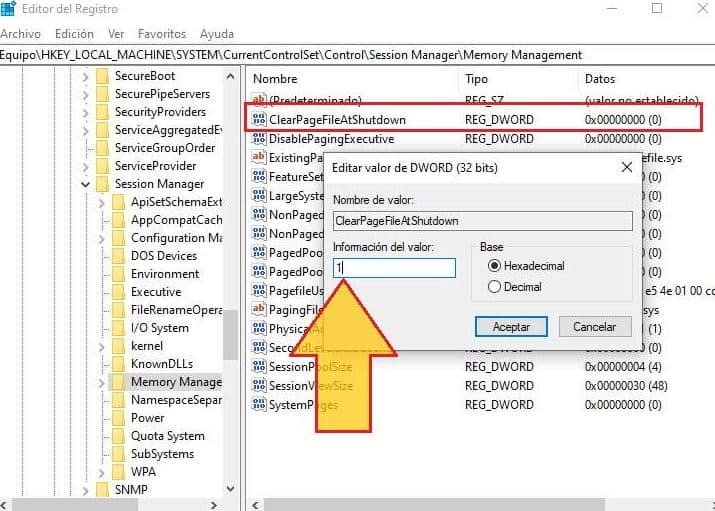
5. Solve the problems with the drivers
Unfortunately, this is a rather difficult failure to detect. It is possible that over time some of the drivers on your PC are outdated, have become obsolete, or are not working properly.
This usually happens especially after receiving a Windows update, and as a consequence, you can have memory leaks, a decrease in performance in general, and greater consumption of RAM.
The solution is very simple: update the driver that is giving you problems. To find out which hardware or peripheral component needs a driver update, follow these steps:
- From the Windows search engine, type “Device Manager” and open the application suggested by the system. If you have an old version of Windows, you can locate the device manager from the classic Control Panel.
- Here, you will see a list with all the hardware components connected to the PC at the moment. Locate any device that has a yellow alert symbol.
- The yellow alert symbol indicates that there is a problem with the drivers for that device. Right-click on the device and select “Update Driver.”
- First, it allows Windows itself to try to update the driver automatically. If there is no success (something quite common), look for and install the drivers manually. Visit the manufacturer’s page and locate the latest drivers for your device or component.
Conclusion
If you still have problems with insufficient RAM after carrying out all these actions, you should consider reinstalling Windows from scratch. Of course, it is also possible that some of the programs installed are too demanding and require an expansion of RAM memory on your computer.
In this case, consider purchasing an additional RAM memory module for your PC. Check that there is at least one free slot for RAM, and make sure you purchase a module compatible with your computer’s motherboard.
